¶ Introduction
Maestro is purposely built for knowledge orchestrators. It is a toolkit which supports those who design, build, test, deploy and operate Orchstra systems.
Maestro is provided as a service to authorized users. It is a SAAS platform that allows the user to bring up various tools to visualize and interract with a knowledge space. With Maestro you can connect to a local knowledge space or global hosted knowledge space. Additionally, Maestro enables key management and adminstraiton functions allowing you to do things like set authorizations and monitor the status of the the various adapters and services running on your servers.
¶ Signing up for Maestro
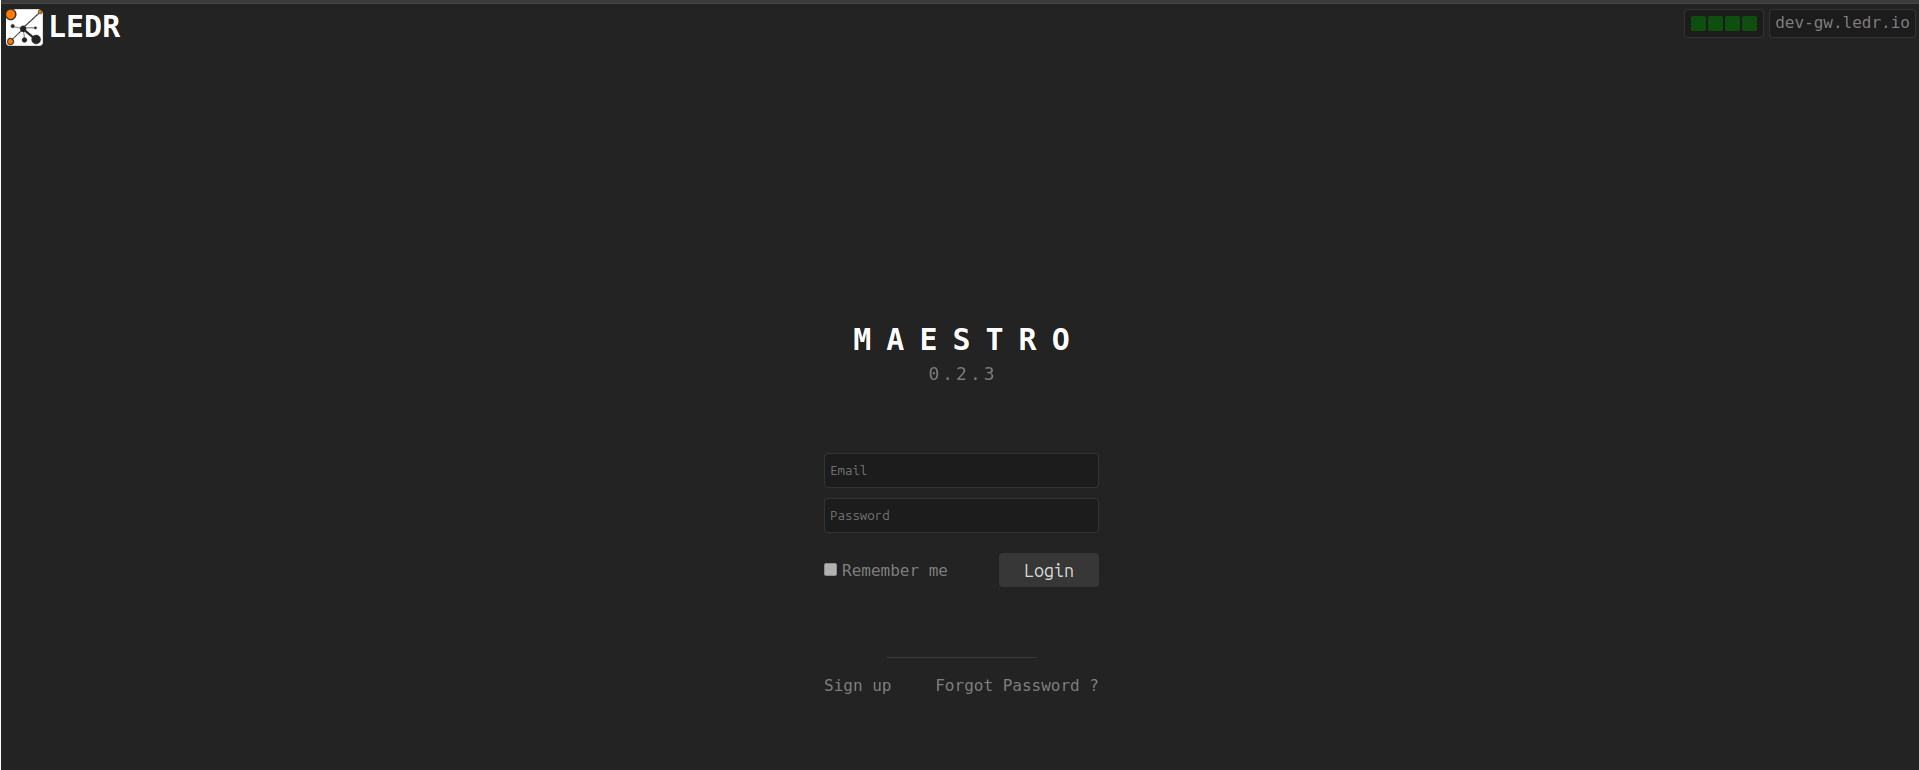
Maestro access is your first step into the world of Knoweldge Orchestration. To get access to Maestro simply go to Maestro
If you are using Maestro for the first time use the Sign Up option to register. After you have registered, login using your credentials.
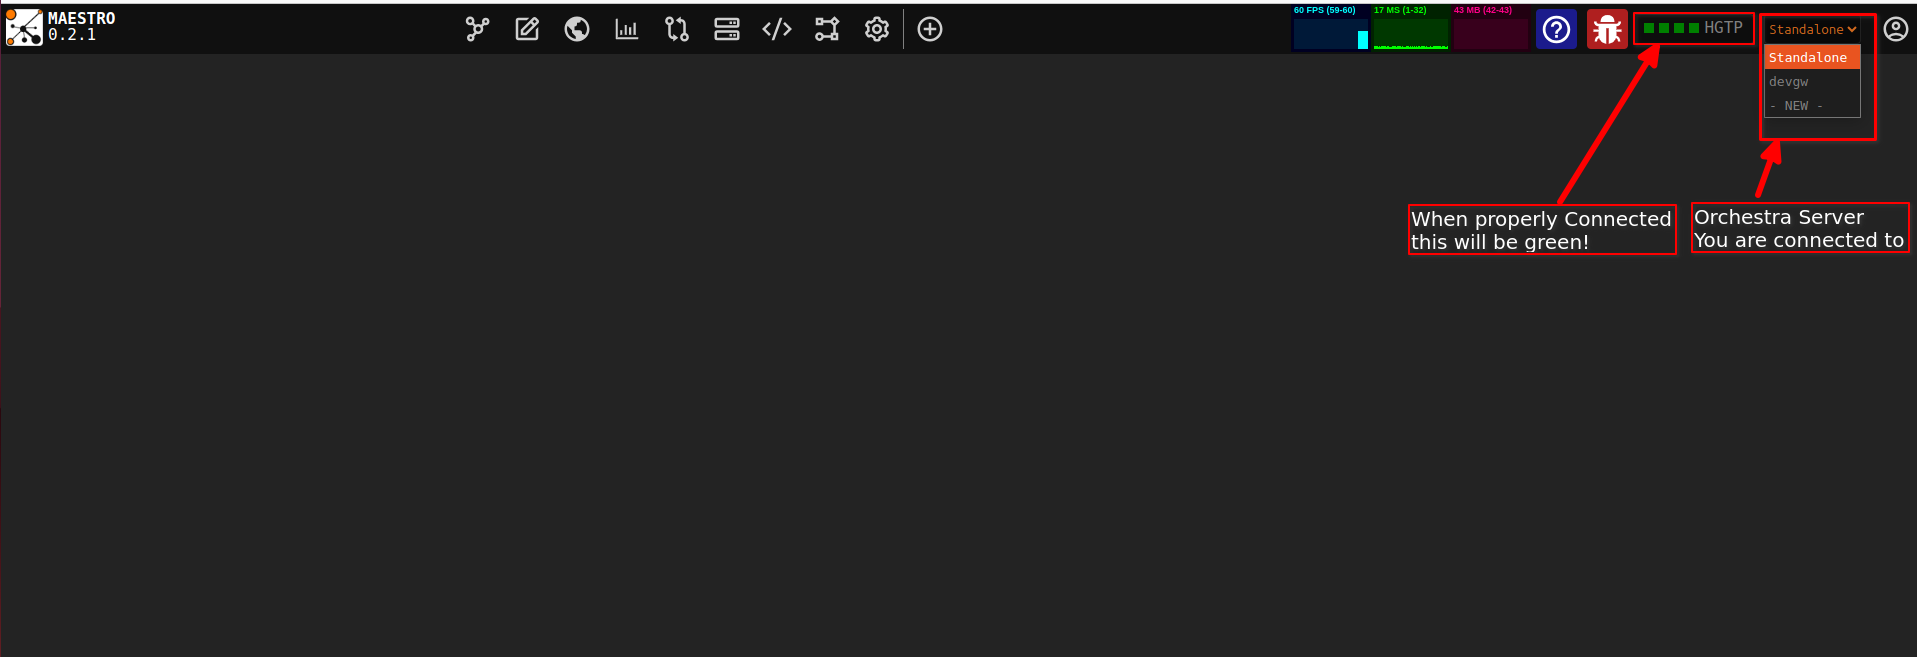
Once logged in double check the following information to make sure that you are properly connected and ready to use Maestro.
- There is an established HGTP(Hyper Graph Transfer Protocol) connection.
- Your Username/Email is displayed next to the HGTP(Hyper Graph Transfer Protocol) connection.
- You are connected to the right Orchestra Server.
For now, User self sign-up is not supported now, Ledr will provide the user with credentials
¶ Navigating in Maestro
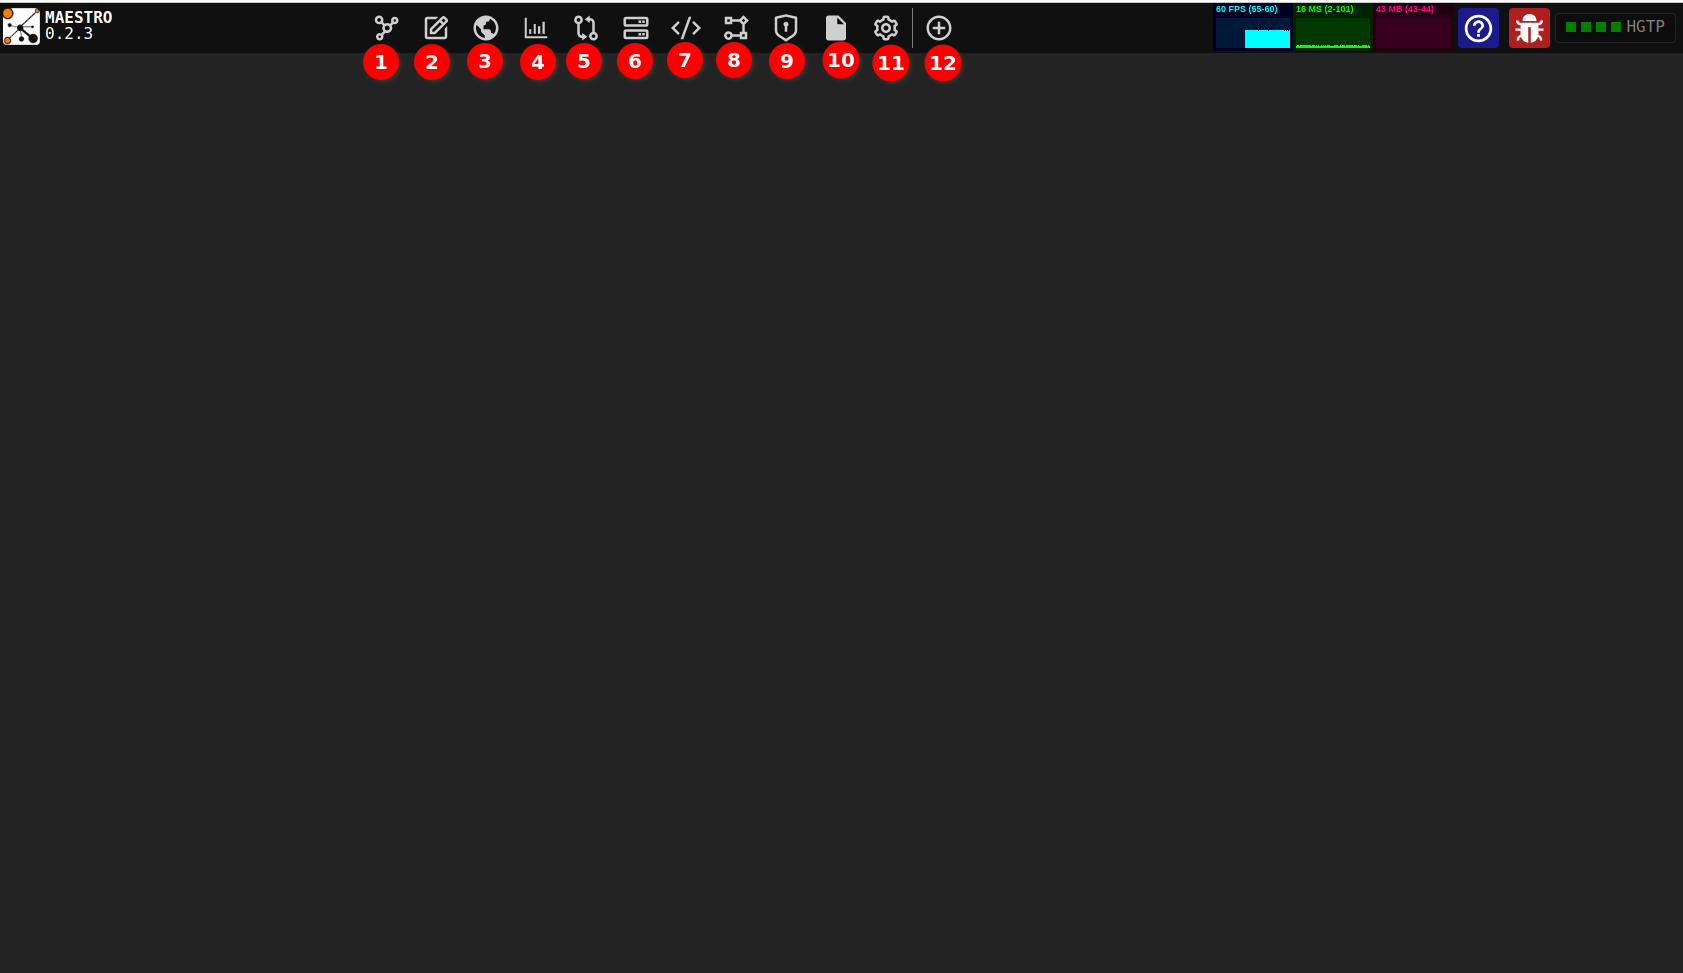
Once you are logged in to Maestro you will have access to the following tools pinned for quicker access:
The following list of preloaded instruments will likely change
- Browser
- Edit
- Space
- Chart
- Modeler
- System
- RequestForge
- Flow
- Access Control
- Files
- Settings
- Panel Manager
Maestro is a very customizable tool; in terms of the look and feel and the tools you open on your environment. Your maestro will look different from the next person. More tools(Instruments) are available and you can open and manage them from the Panel Manager.
¶ Where to start.
¶ The Maestro Toolkit
Various tools(you will find in some areas it is refered to as instruments) are available inside Maestro. Below are the current tools, their purpose, and some basics on each.
¶ windowManager
Window manager lets customize your Maestro by building custom panels that contain different instruments that you will need for your tasks. From the Window Manager you can split your view and have each view open a different instrument. You can then use the Linker to string the instruments open in different views together, such that output from one view is used as Input on the other linked view.
Step 1: Open the Window Manager
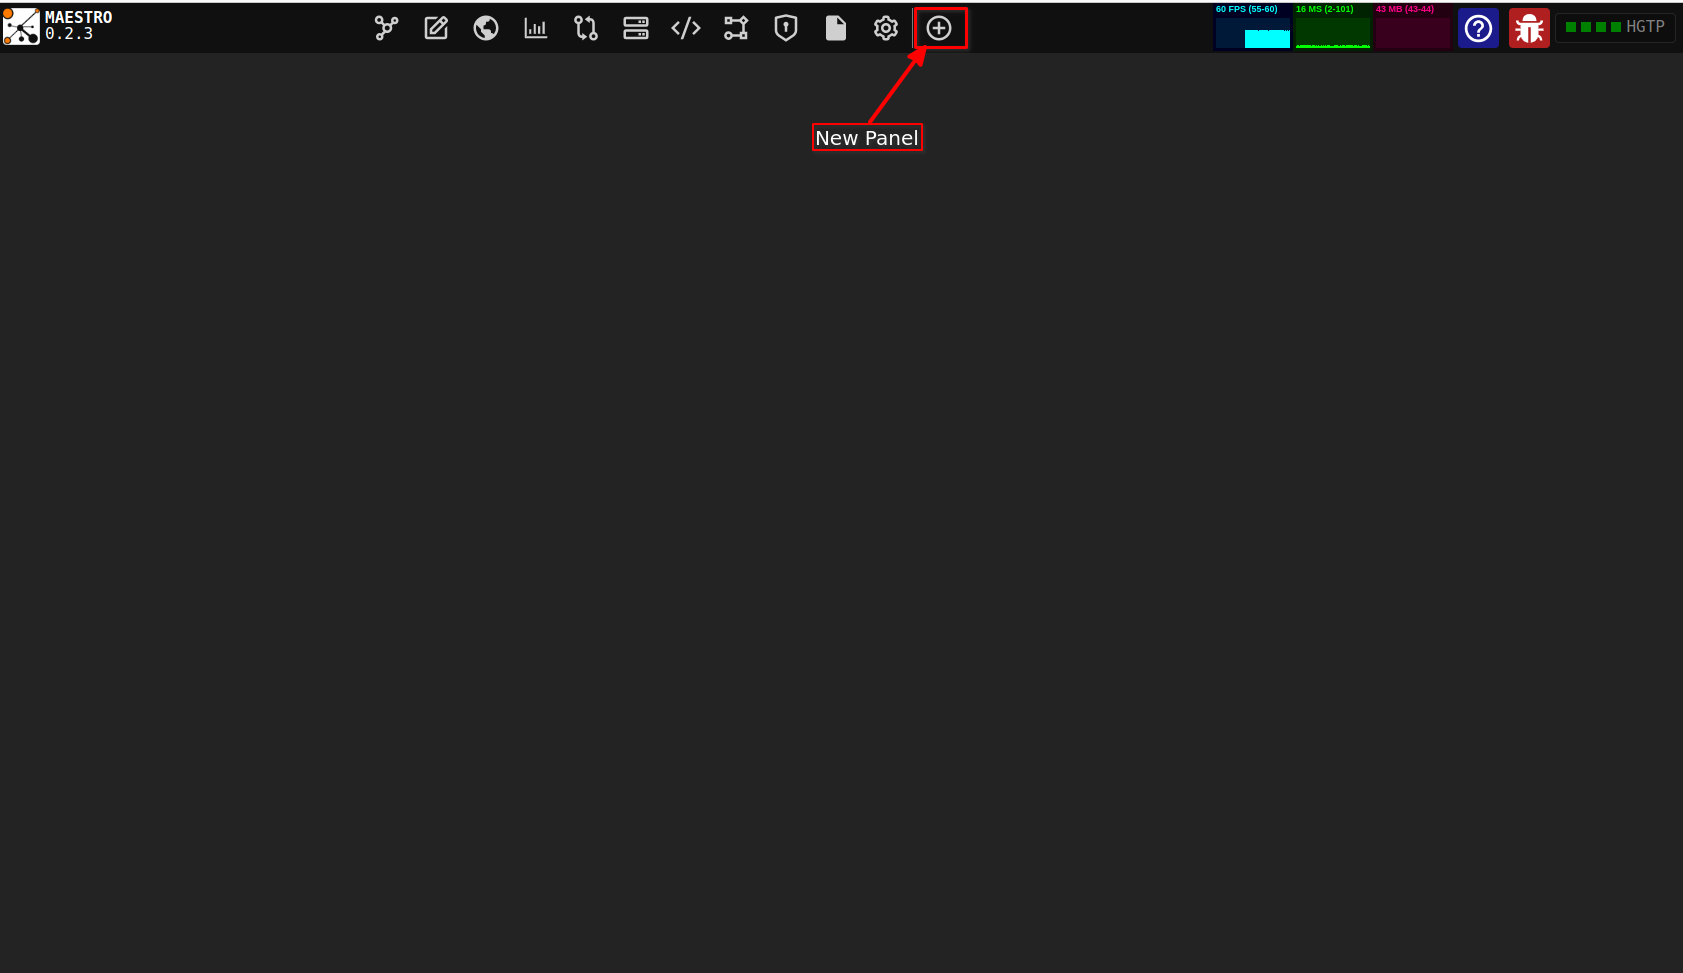
To open the Window Manager Tab click on the "New Panel" button. From the Window Manger Tab you can create and manage instruments categories, new panel, as well as save your customized panel.
Step 2: Add a New Panel
Once you open the Window Manager a temporary panel is created and once you have customized you save it for reuse. You also option to delete Panels you nolonger need.

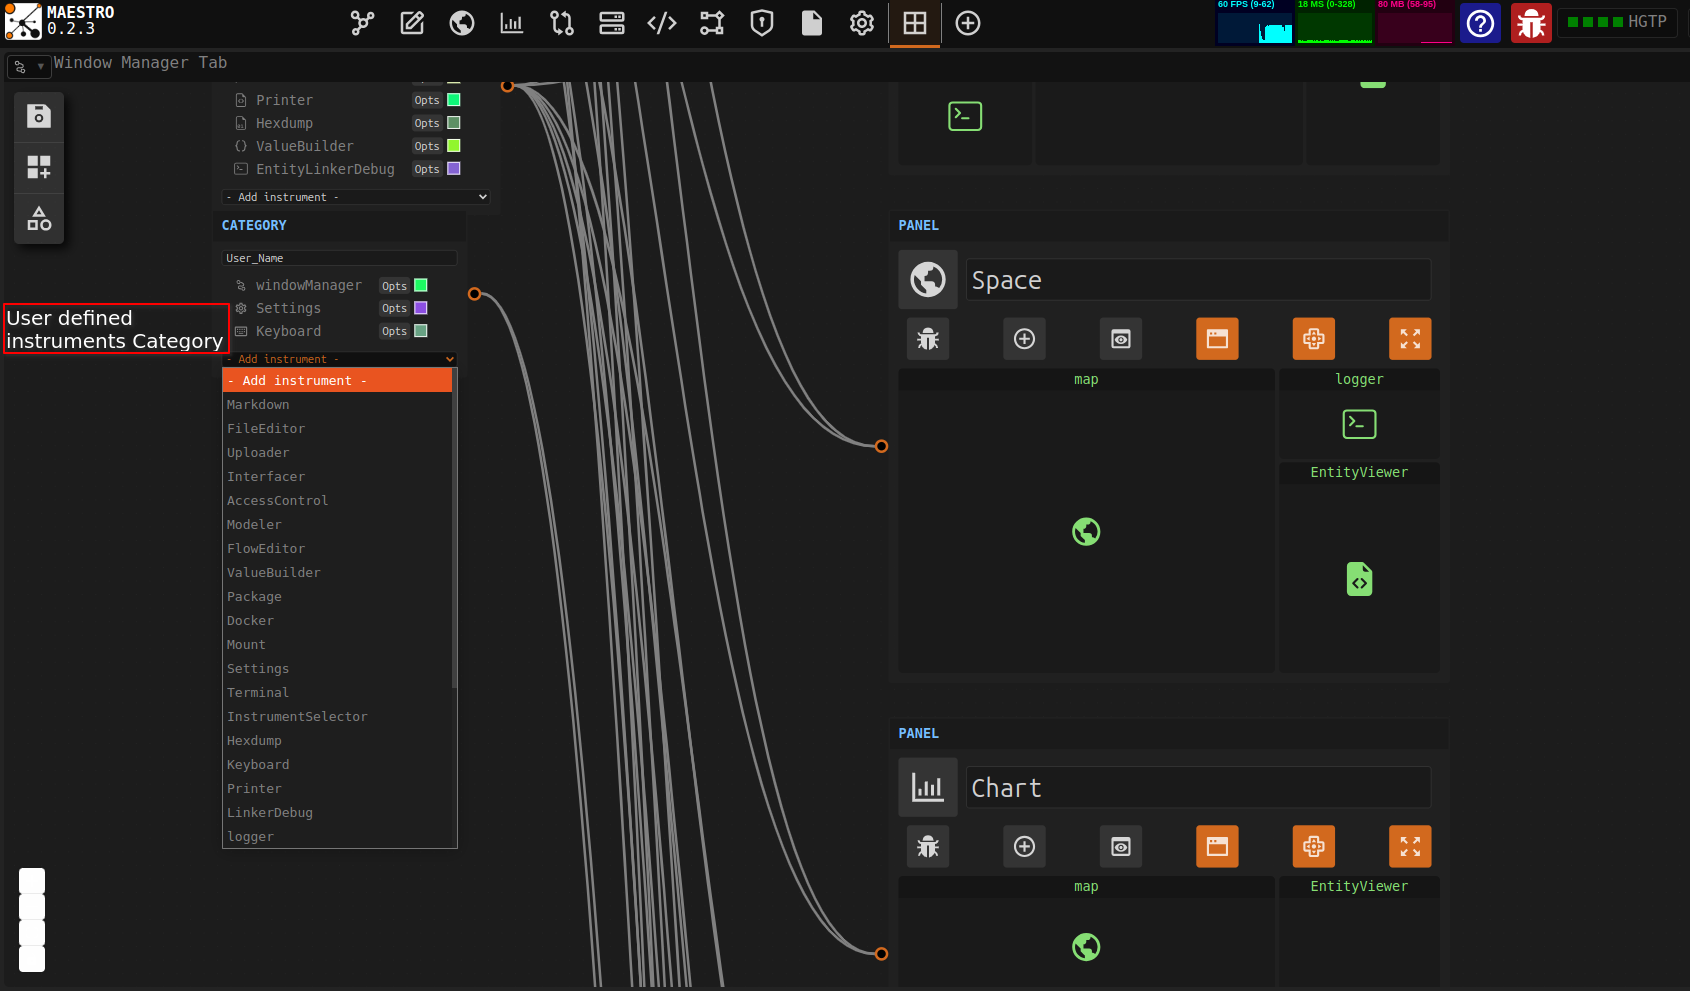
From the Window Manager window, to add a new Panel click the New Category button from the toolbox.
Modify the default user name by clicking into the user name field and entering your desired name.
Then select the instruments you want to be contained and accessible from the category from the instruments dropdown list on the category.
Step 3: Add a New View
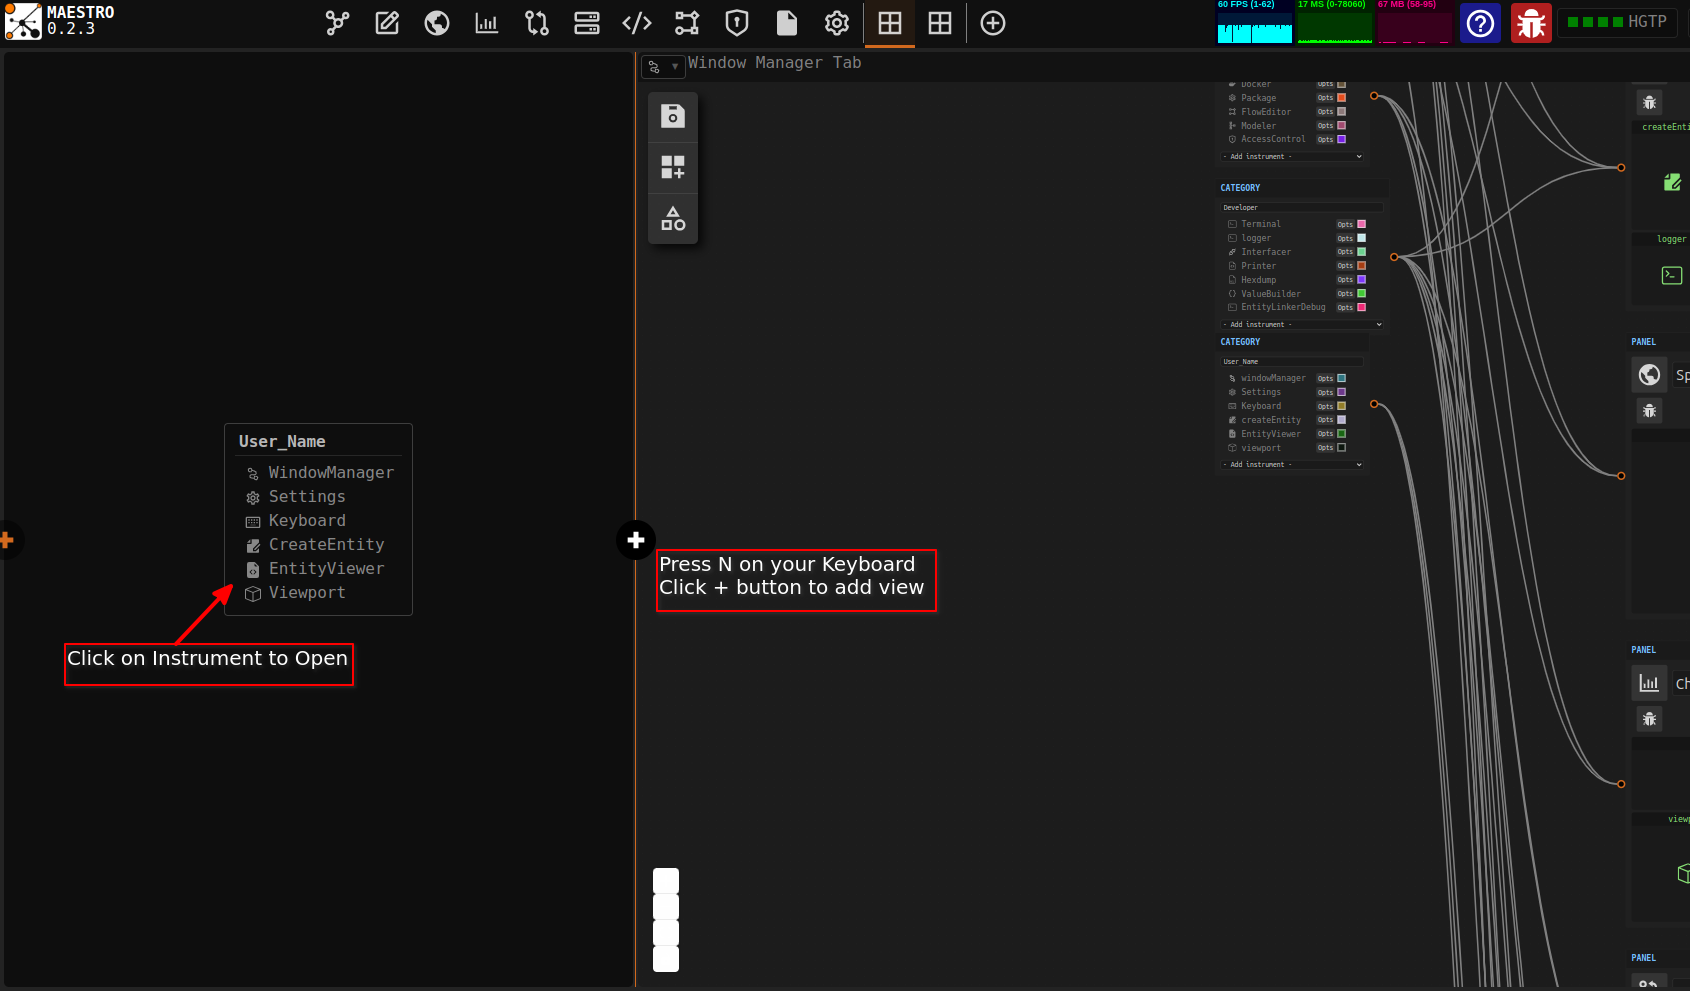
Inside the window maneger you can open several views to enable you to open, view and interact with more than one instrument at a go. To do this, on the Window Manager Tab, press the N key on your keyboard to activate the add new view function.
Click the New View button (plus icon) to create an additional visual window for interacting with instruments.
You can then adjust the size of using the Fit to View button to auto-scale your view area for better visual alignment or using the manual resizing cursor.
Step 4: Link Views
You can link two instruments that are opened in the segemented view and have the outputs of one instrument feed in to the input of the other.
Use the ctrl + L key to activate linking mode. Once the linking mode is activated, Drag and drop from the output port of one instrument to the input port of another to create a connection.
Keyboard Shortcuts:
- KeyN: Create a new view
- KeyL: Open/close the linker
¶ EntityViewer
Use EntityViewer to view entity's information. To access information about an entity you use an entity's unique id EID to fetch the information from the knowledge space.
Use the following steps to view an entity:
Step 1: Access the Entity Viewer Interface
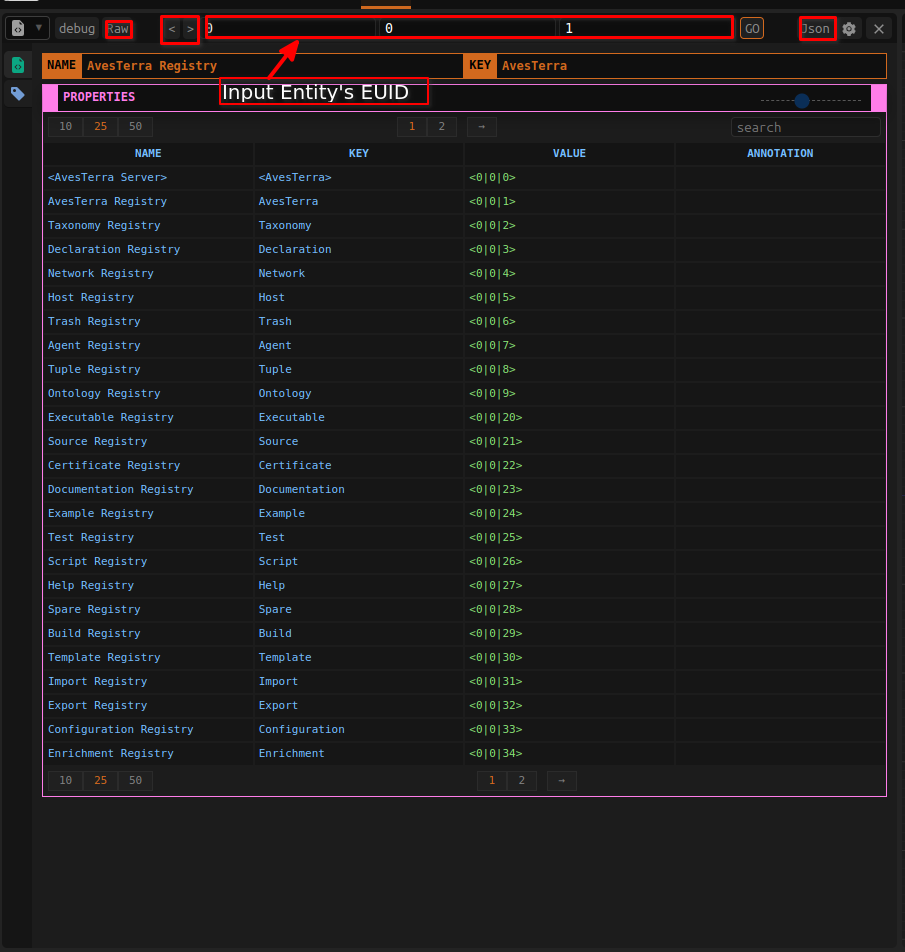
On the Interface type the EUID values to their respective fields. The following are the fields and what you need to provide:
- NID: Namespace identifier
- HID: Hierarchy identifier
- UID: Unique ID of the entity
Step 2: Search for the Entity
When you click the Enter or 'Go' button matching entity's information will be displayed.
Step 3: View Entity JSON
To inspect the raw JSON representation of the entity, use the 'Raw' toggle button to view JSON structured data format.
Step 4: Copy Entity's Information as JSON
If you want to transfer the entity's information to another text file click the 'JSON' button, this will copy the information in a JSON format to your clip board. You cant then paste it in your text file.
¶ createEntity
createEntity is an instrument used to create an entity in the knowledge space your are connected to. The knowledge space can be your local knowledge space or a remote knowledge space you are connected to.
Use the following steps to create an entity:
Step 1: Open the create entity instrument
Navigate to the Maestro’s entity creation interface:
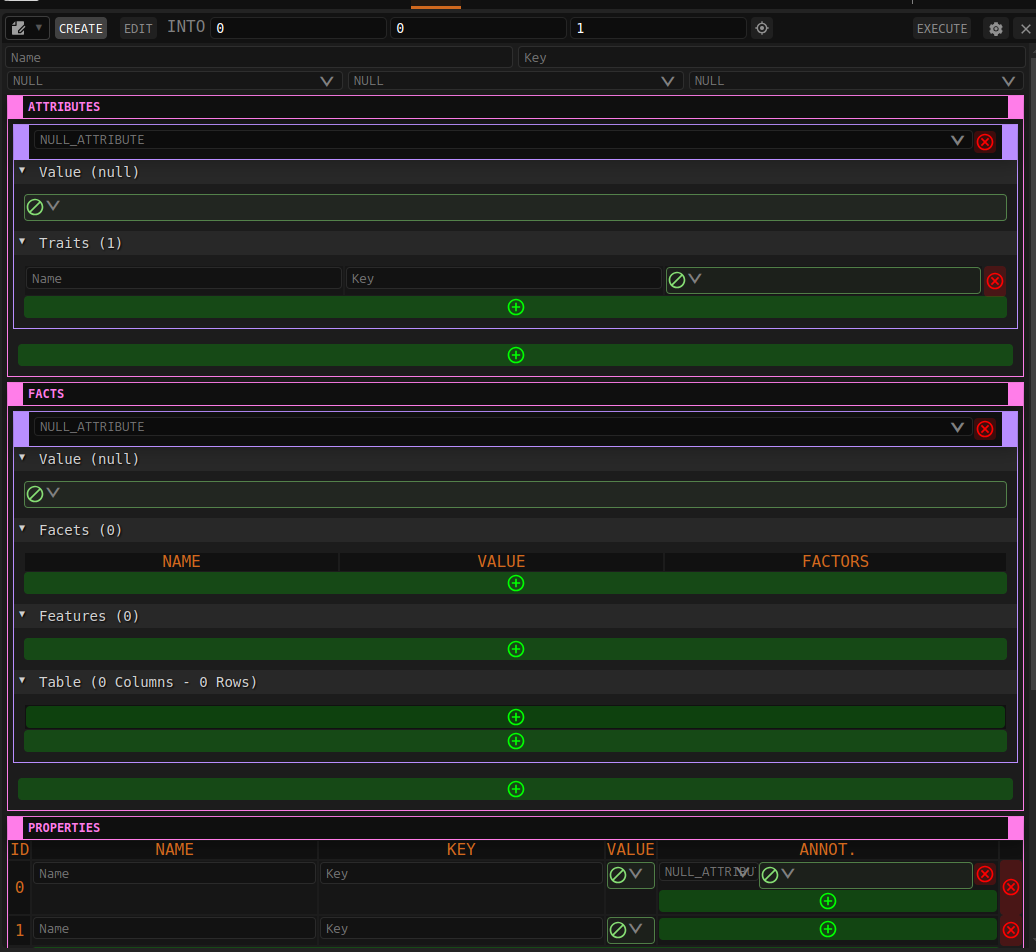
Step 2: Provide Entity Name, Key, Category, Class and Context
Fill in the required fields for the new entity:
- Name: The name of the entity
- Key: A unique identifier for the entity
- Category: Select from available categories
- Class: Select from the classification options
- Context: Choose the appropriate context for the entity based on the knowledge space you are working on.
Step 3: Add Entity Attributes
Entity attributes are defined by the Orchestra taxonomy, from the drop down list select the appropriate attribute and provide value in the 'VALUE' field.
Step 4: Add Facts
A Fact is an attribute/value pair where each attribute, if not null, must be unique for the entity.
Each fact can have zero or more facets, features, fields, and/or frames.
Facets are name/value pairs where each name, if not null, must be unique.
Every facet of a fact can also have zero or more factors.
A factor is a key/value pair where each key, if not null, must be unique Facets provide a convenient way to represent multiple named instances of a fact attribute. With facets uniquely identified by their name, factors provide a means to add uniquely keyed values to facets.
When the multiple instance notion is not needed, features are used allowing full name/value pairs with an optional key to be associated with a fact. Each key of a feature again, if not null, must be unique. Features behave much like properties, but are associated with a fact attribute versus an entity itself.
Finally, the combination of fields and frames provide a general-purpose means for building tabular structures of arbitrary length
(rows) and width (columns).
Step 5: Add Entity Properties
Properties are lists of name/value pairs, each with an optional key field,
that can be associated with any entity. A property list can be quite large and is particularly useful
for organizing values based on a unique key.
Step 6: Finalize Creation
Once all details are filled in, click the 'EXECUTE' to persist the new entity in the system.
Step 7: Edit
You can switch from CREATE mode to 'EDIT' mode by clicking the 'EDIT' button and then change an enity's infromation.
¶ viewport
The Viewport instrument provides an interactive interface for viewing relationships between entities and Registries in a knowledge graph.
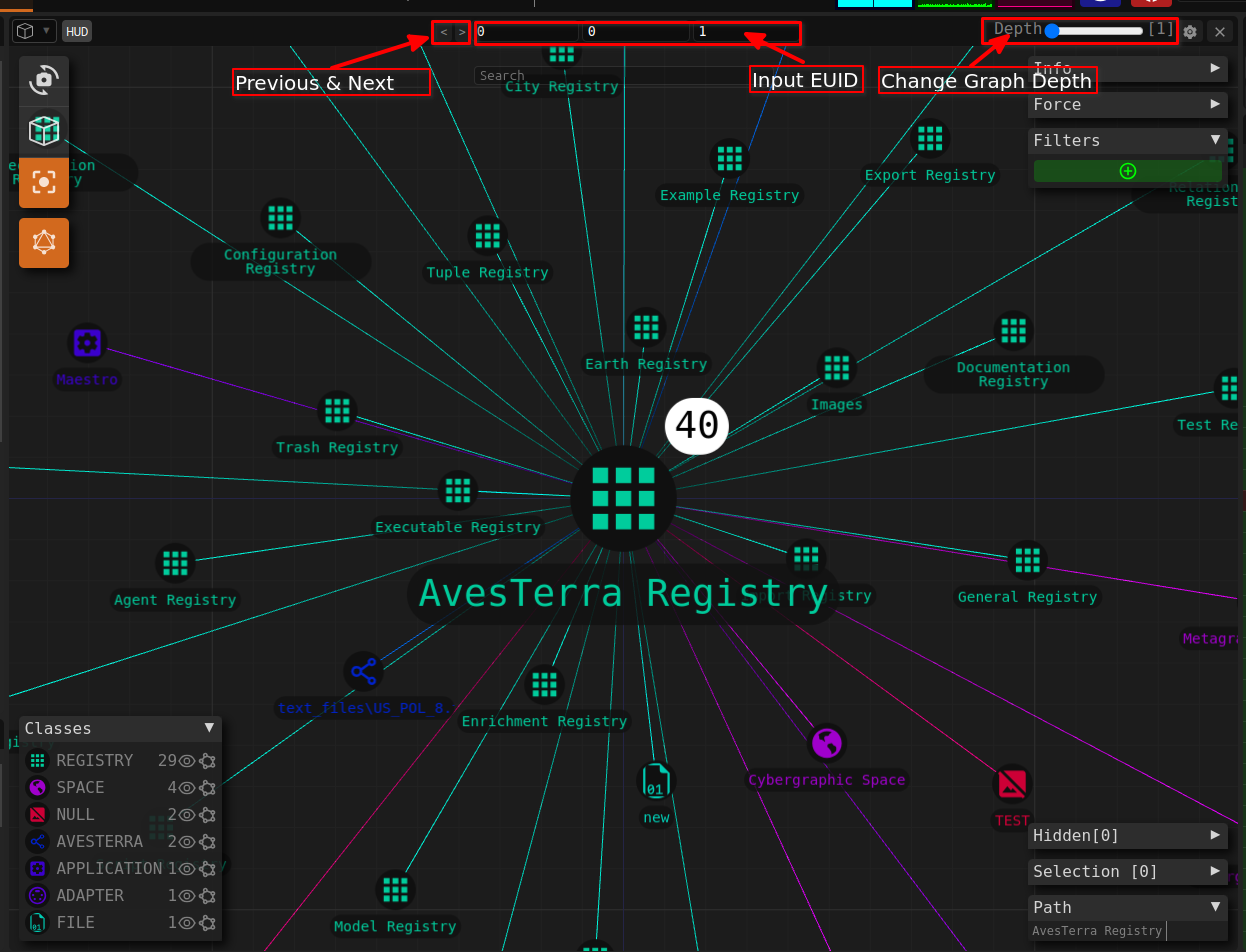
To view a subset of a graph you can search a specific registry you want to look at using it Name or EID. Additionally, you can zoom into a certain area of the graph or pan accross the knowledge graph.
¶ logger
The logger instruments is useful for debugging your invokes with the orchestra server. It logs out HGTP Request to your serrver. It shows the timestamp when the request is made, the time it takes, the EUID, the type of request(FETCH, ENVOKE). For more details you can on a specific request click on the 'Expand' button on the specific request.
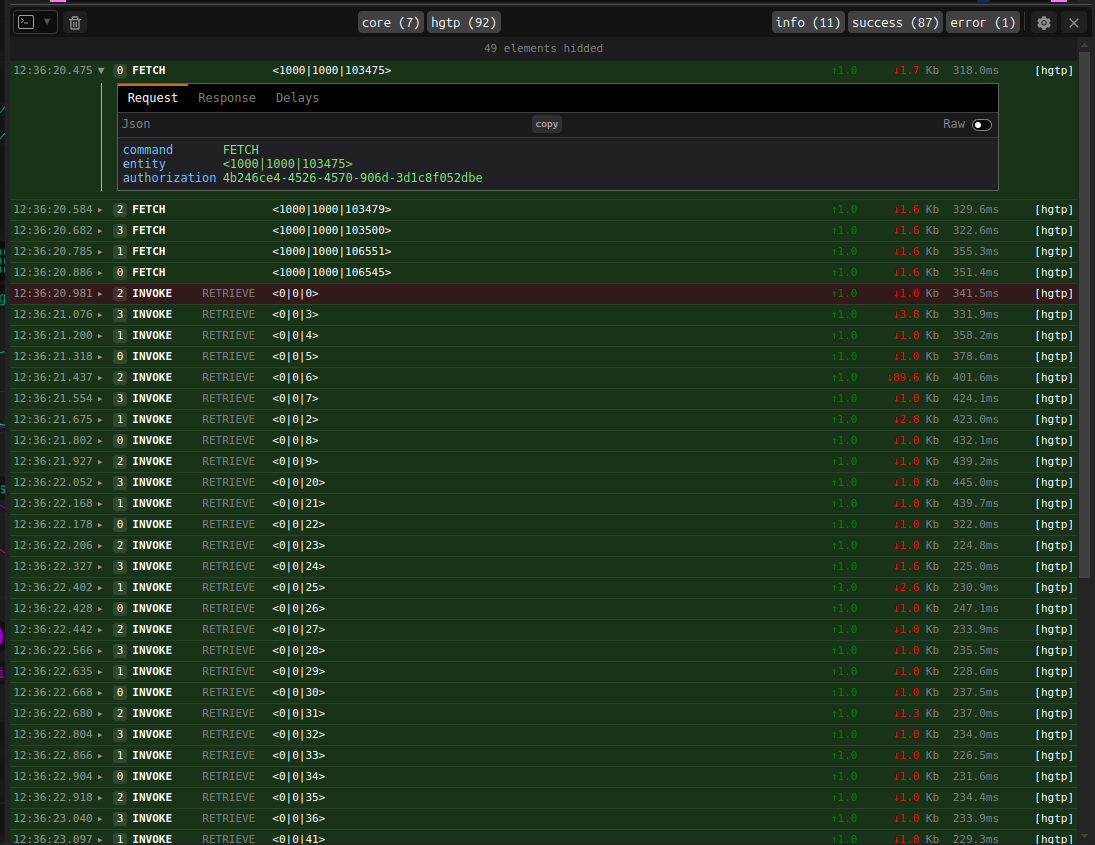
When you open a request entry in the logs you can see the request Payload, the Response, and Delay
¶ Settings
Provides a way to customize your user and session information.
¶ Keyboard
The Keyboard instruments provide a virtual open source keyboard you can use for inputs.
Maestro supports binding customized interaction as you wish.
Some of the saved mappings are:
- onPress N - Will show new Window
- toggle D - Will open debug
- ress L - Will open the Linker Instrument
- ress X - Will delete existing link
¶ Flow
The Flow instrument allows you to string together several adapters(Refer here for more information on adapters) and have
¶ map
Instrument for visualizing entities' geographic information. It is backed by the leaftlet open source library
¶ System
View a system entity (produced by a system adapter), it contain all constants as cpu, OS, memory, usage of all of them.
Somes button to executes related SETTER actions (as reboot, update etc...)
This instrument can display LIST of systems (filtered or not).